


This is now my third version of the #mndawnjeans, and I think I’ve finally perfected the fit! This is the first time making the wide leg view, and I think I may like these better than the Persephone pants!
I decided to properly make toiles prior to cutting into my denim, and I am so glad that I did. I made a lot of changes, and learned a few new pants-fitting tricks, so hopefully you find some of this blog post helpful! For reference, I have a larger hip to waist ratio that puts me between sizes normally- W: 29.5” H: 41.5”. I think this ratio, plus having a long torso is also why I tend to have crotch depth and length issues with most patterns.
Fabric: I used a 9.5 oz organic cotton denim from Sitka Fabrics (gifted) with 2% elastane. It has about 10% crossgrain stretch. It is a really lovely lightweight denim that was a dream to sew with.
Notions: also from Sitka Fabrics- their new denims and jeans making supplies are all just amazing!


Pattern Adjustments:
First off, if you are planning on making this pattern with stretch denim, I would recommend sizing down one size to start with (depending on stretch %). This pattern is designed for non-stretch rigid denim, so sizing down is necessary if making them in a stretch denim. I didn’t know how much I would need to size down, so cut my regular size, and ended up taking in the side seams and yoke. This method works, but isn’t ideal as you lose pocket space at the side seam and it could throw off the balance of the pants.
I toiled with non-stretch fabric, so that I could get the crotch curve right. I compared my measurements with the size chart and was between a size 10-12 for waist, and 14 for hips. I decided to grade from a 12 waist to a 14 hip, as I don’t like my jeans to be too tight.
When grading between sizes in jeans, you have to make sure you grade all of the pieces to the correct size, not just the pant leg pieces. I graded my yoke and waistband to a size 12 as well. The pocket is one size, so that did not require grading. I love this Cashmerette blog post for grading pants.
I also measured the crotch depth and crotch length. The length of the back crotch was about 1″ short, so I extended the back crotch hook to the size 18 point. The depth was ok upon measuring, but I ended up having to add to this.
TOILES:
This is my first toile. It looked ok, but the crotch felt much too tight. I suspected it was crotch depth that was too short, but was feeling lazy, so experimented with adding some length to the crotch hook. It can sometimes be difficult to figure out which one needs adjusting, it will take a bit of experience to figure out which change you need. A good thing to remember is, the crotch depth is the vertical measurement from the crotch to the waistband. If you feel like the pants are cutting you in half, or like you’re getting an extreme wedgie, depth is likely the culprit.
Crotch length is the measurement of the crotch hook, from top of the centre front and back up to the centre back. This measurement dictates width- as in the width of the pants, and the space that your body takes up in the pants. Here’s a visual I like to describe the difference between these measurements. Extending the crotch length can be a tricky exercise, as I learned.

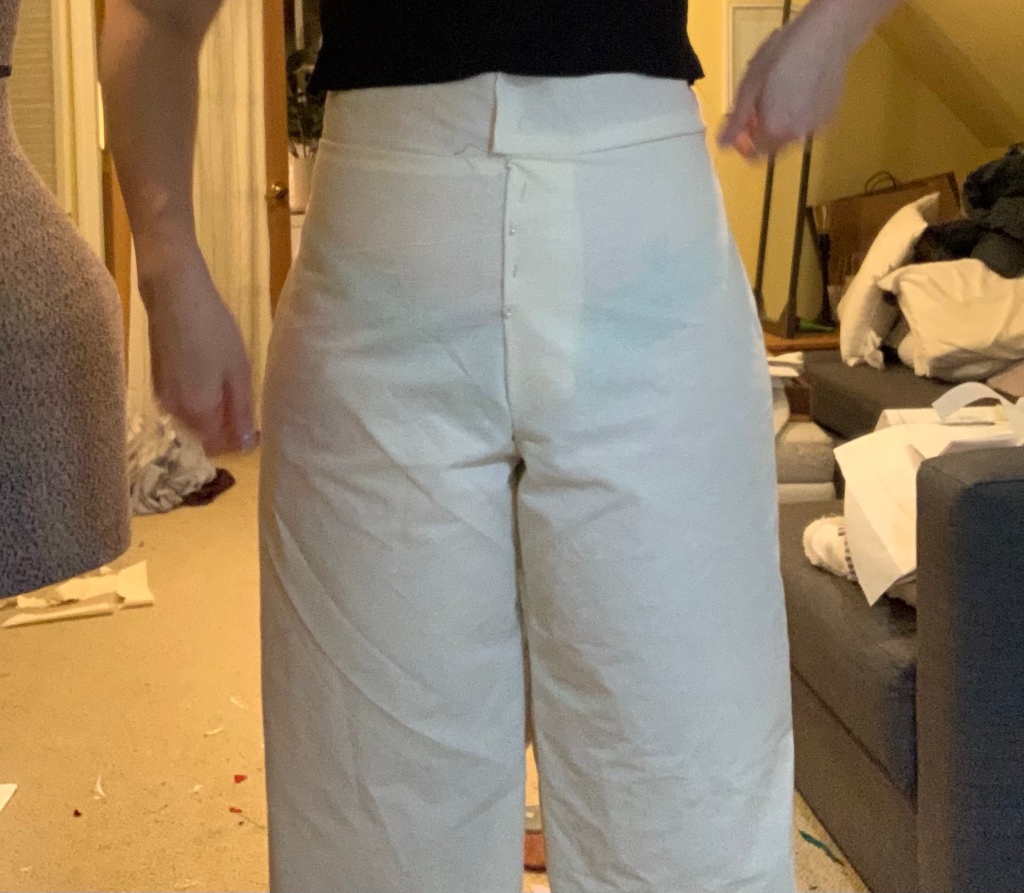
Here is a photo of my second toile with 1″ added to the back crotch hook. I added to the back, as it was the back that felt tight. This ended up being the wrong fix, as it added too much fabric at the inner thigh and gave me a lot of drag lines.

I decided to go back and cut a new toile after this, and added 3/4″ to the crotch depth (rise). This was the right fix, but wasn’t quite enough- so for the final pants I added 1″ to the depth on each piece- front and back. For this change, you cut a line straight across the pants above the crotch hook, making sure the line is perpendicular to the grainline.

As you can see in the photo below, it was definitely crotch depth that was needed, and the pants have much less excess fabric and less drag lines beneath the bum.
I decided I still wanted to address the drag lines though, and tried taking a small fisheye dart out of the back leg. It ended up working like a charm. This is technically a flat seat adjustment. It worked even though I don’t tend to feel like my seat is flat! I think what the problem is, is that my hip circumference is widest at a point that is lower than the pattern, so that tends to pull the fabric down just below my bum. I have no idea if this is the main issue, but the fisheye dart did work, so I will be keeping this adjustment in mind for future pants!

To translate that to my pattern, I followed this tutorial to make the change to my pattern. I also took out a very tiny dart at the middle of the back crotch curve for shaping, and simply slashed and overlapped the pattern to make that change.
From there, I cut my pants pieces out and sewed them together, basting to fit.
With the stretch factor, here are the additional changes I made:
- sewed the side seams an additional 3/8″ larger (sewed them at 1″ instead of 5/8″)
- removed 3/8″ from centre of yoke (swayback adjustment
- removed 3/8″ from top of yoke at centre, grading to nothing at side seams


The last change I made, was to cut the front pants piece with the fly extension on it, so that I could sew the fly using the Closet Core Fly Sewalong. This is by far my favourite way to sew flies, and produces a much neater fly in my opinion. To see how I did this, I have an older blog post showing how I modified the Persephone Pants to have a zip fly instead of a button fly here.
